В этом документе описано как установить и настроить рабочую систему Samba 3 / LDAP на Debian Sarge.
Описан простейший случай: LDAP, Samba и PHP LDAP Admin запущены на одном и том же хосте.
Предварительные условия
- Заново установленный Debian Sarge на одном ПК. Одна или несколько Windows 2000/XP станций для проверки работы с ним.
- Представление о том, что такое Samba и LDAP.
Другая документация
Великолепная документация находится в пакете samba-doc (/usr/share/doc/samba-doc/htmldocs/). Подробности читайте в Samba-Guide.
Сеть
- debian.nomis52.net , Компьютер с Debian Sarge, который будет LDAP/Samba сервером.
- quigon.nomis52.net , Рабочая станция Windows 2000.
Программы
Мы будем использовать следующие пакеты:
- slapd (2.2.23-8)
- Samba 3 (3.0.14a-3)
- phpldapadmin (0.9.5-3)
- libnss-ldap (238-1)
- libpam-ldap (178-1)
- nscd (2.3.2.ds1-22)
Порядок действий
Установка Slapd
- Install the LDAP server:
$ apt-get install slapd
Answer the following questions:
- DNS domain name: nomis52.net
Name of organisation: Nomis52.net
Admin password: password
Confirm password: password
Allow LDAP v2: yes
I'm only allowing LDAP v2 here because I authenticate web users against LDAP with Apache 1.3. If you don't intend to do this, you can safely turn it off. - DNS domain name: nomis52.net
Установка phpldapadmin
- Phpldapadmin requires a webserver to work. If this is a new install, we'll need to install apache. If you already have apache installed skip this step.
We're using apache-ssl here as we don't want our admin LDAP password being sent over the network in clear text.
$ apt-get install apache-ssl
And answer with the following
- Enable SuExec: no
Country Name: AU
State: WA
Locality: Perth
Organisation Name: Nomis52.net
Organisational Unit Name: Home
Host Name: debian.nomis52.net
Contact Email: root@nomis52.net
- Enable SuExec: no
- Next we install phpldapadmin which provides a web interface for managing information in LDAP
$ apt-get install phpldapadmin
And use the following to answer the questions
- Authentication type: session
Configure webserver: apache-ssl
Restart: yes
- Authentication type: session
- Phpldapadmin requires a utility called mkntpwd to create the Samba password hashes. This used to be included in smbldap-tools but doesn't appear to be included in Debian (there is a ITP here).
You can download mkntpwd.tar.gz. Then run the following:
You'll need the following packages installed: make, gcc and libc-dev.
$ tar -zxf mkntpwd.tar.gz
$ cd mkntpwd
$ make
$ cp mkntpwd /usr/local/binCheck by running:
$ mkntpwd
And you should get the help message displayed.
Установка Samba
- Now install samba and the samba-doc package
$ apt-get install samba samba-doc
And answer with the following:
- Domain Name: nomis52
Use Password Encryption: Yes
Modify smb.conf to use WINS settings via DHCP: No
How to run Samba: daemons
Create password database: Yes
- Domain Name: nomis52
Настройка и наполнение LDAP
- slapd needs the Samba schema to work. Do the following:
$ cd /usr/share/doc/samba-doc/examples/LDAP
$ gunzip samba.schema.gz
$ cp samba.schema /etc/ldap/schema/Now add the following line to /etc/ldap/slapd.conf after the other includes:
include /etc/ldap/schema/samba.schema
And restart slapd:
$ /etc/init.d/slapd restart
- We now need to create containers in LDAP for our users, groups and machines. Log into phpldapadmin by going to https://debian.nomis52.net/phpldapadmin/ (obviously insert your address here).
Login with the password for the admin LDAP user.
Expand the root of the tree, then click "Create New Entry Here"
Select "Organizational Unit" (ou):
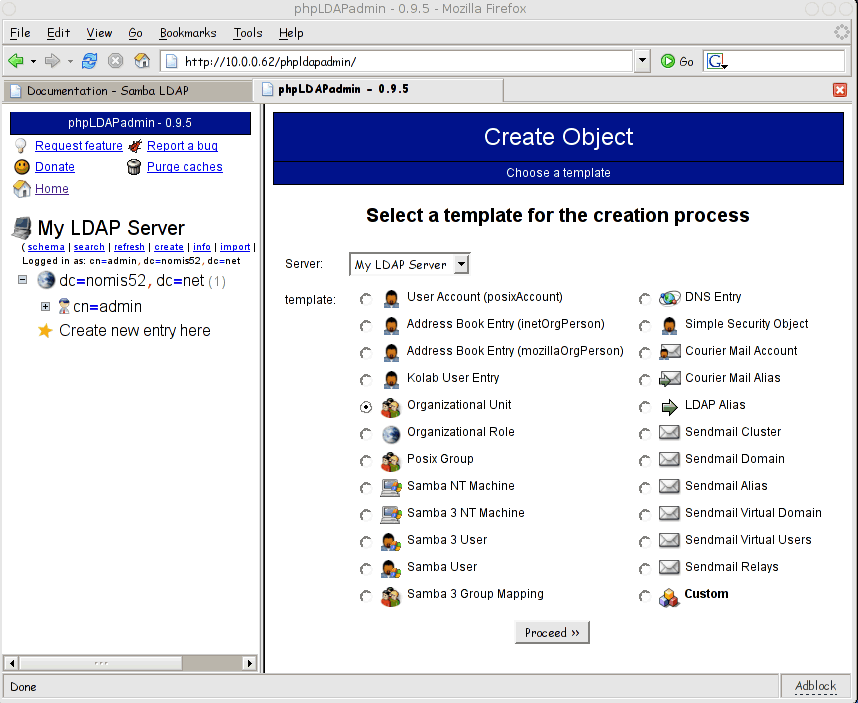
Call the ou "users":
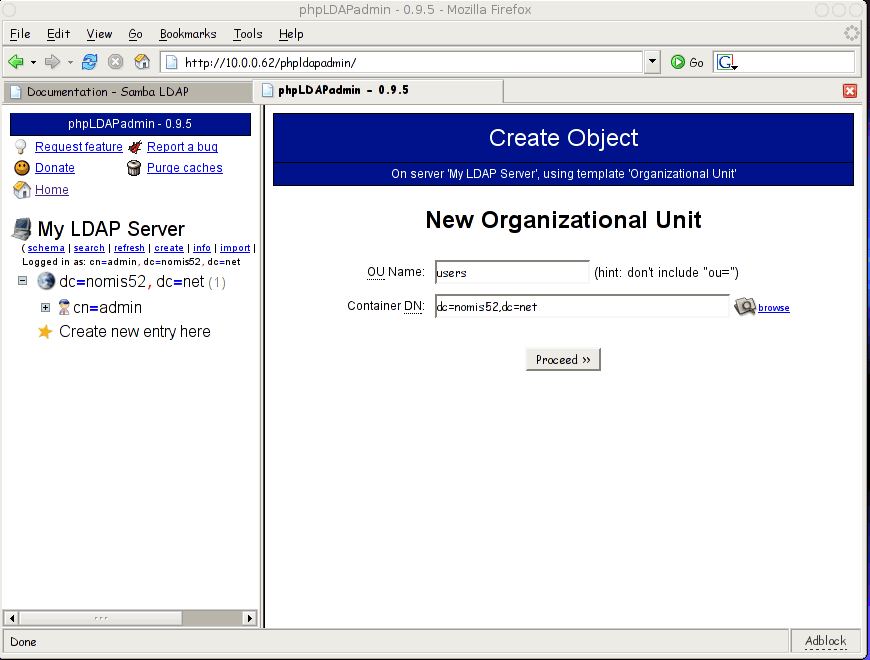
And confirm.
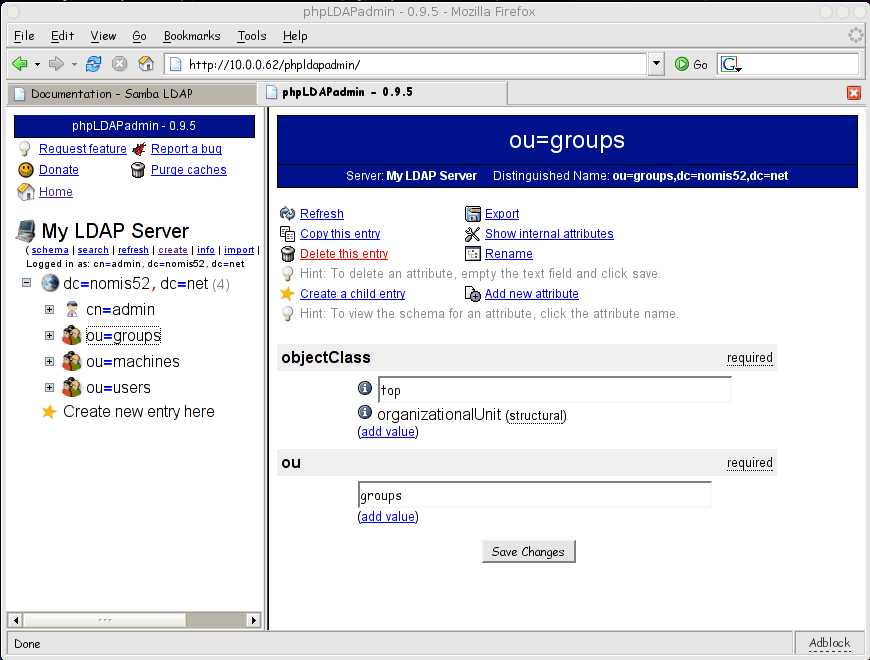
Then repeat the steps, adding two more ou's called groups and machines. You're tree should now look something like so:
Настройка Samba
- Time now to configure Samba. Open the /etc/samba/smb.conf file and find the line:
passdb backend = tdbsam guest
This needs to be replaced with the following
passdb backend = ldapsam:ldap://127.0.0.1
ldap suffix = dc=nomis52,dc=net
ldap machine suffix = ou=machines
ldap user suffix = ou=users
ldap group suffix = ou=groups
ldap admin dn = cn=admin,dc=nomis52,dc=net
ldap delete dn = no# be a PDC domain
logons = yes
# allow user privileges
enable privileges = yes - Run testparm to make sure the Samba config doesn't contain any errors.
- Provide Samba with the root LDAP password like so:
$ smbpasswd -w password
- Restart Samba:
$/etc/init.d/samba restart
- Take a look a phpldapadmin, and you should see that an entry sambaDomainName=NOMIS52 has been created as below:
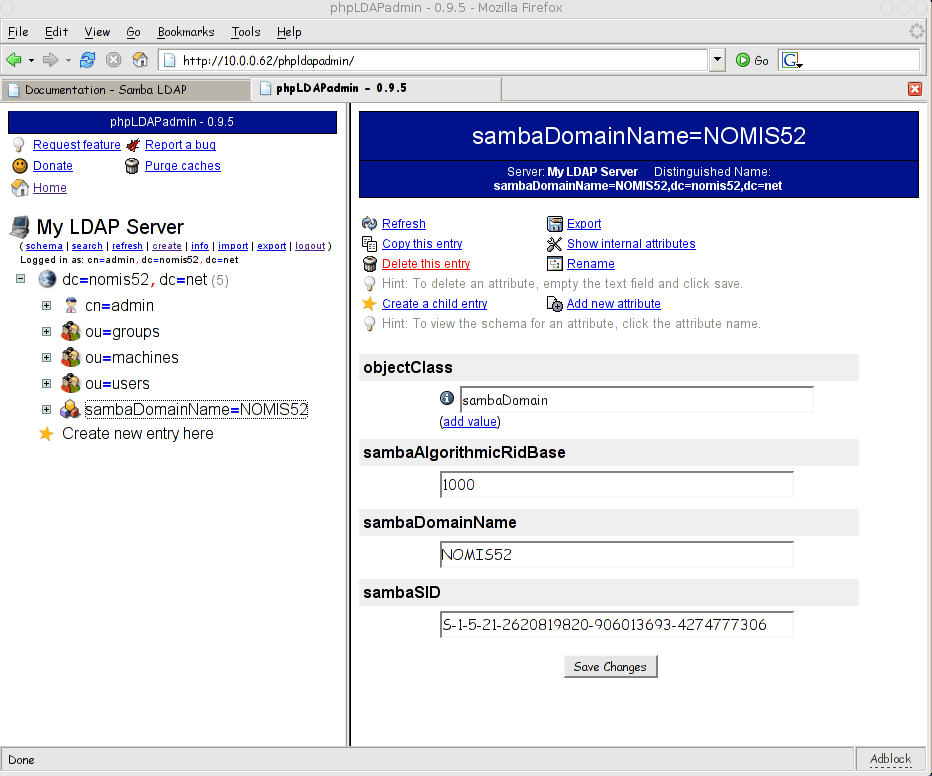
Copy the value of sambaSID (eg S-1-5-21-2620819820-906013693-4274777306 ), we'll need it in the next section.
Настройка Phpldapadmin
- Edit the file /usr/share/phpldapadmin/templates/template_config.php . Find the lines that look like:
// uncomment to set the base dn of posix groups
// default is set to the base dn of the server
//$base_posix_groups="ou=People,dc=example,dc=com";$samba3_domains[] =
array( 'name' => 'My Samba domain Name', 'sid' => 'S-1-5-21-4147564533-719371898-3834029857' );
// The base dn of samba group. (CUSTOMIZE)
//$samba_base_groups = "ou=Groups,ou=samba,dc=example,dc=org";and change it to:
// uncomment to set the base dn of posix groups
// default is set to the base dn of the server $base_posix_groups="ou=groups,dc=nomis52,dc=net";$samba3_domains[] =
array( 'name' => 'nomis52', 'sid' => 'S-1-5-21-2620819820-906013693-4274777306' );
// The base dn of samba group. (CUSTOMIZE) $samba_base_groups = "ou=groups,dc=nomis52,dc=net";Where the sid was the one obtained from phpldapadmin above.
Добавляем группы по-умолчанию
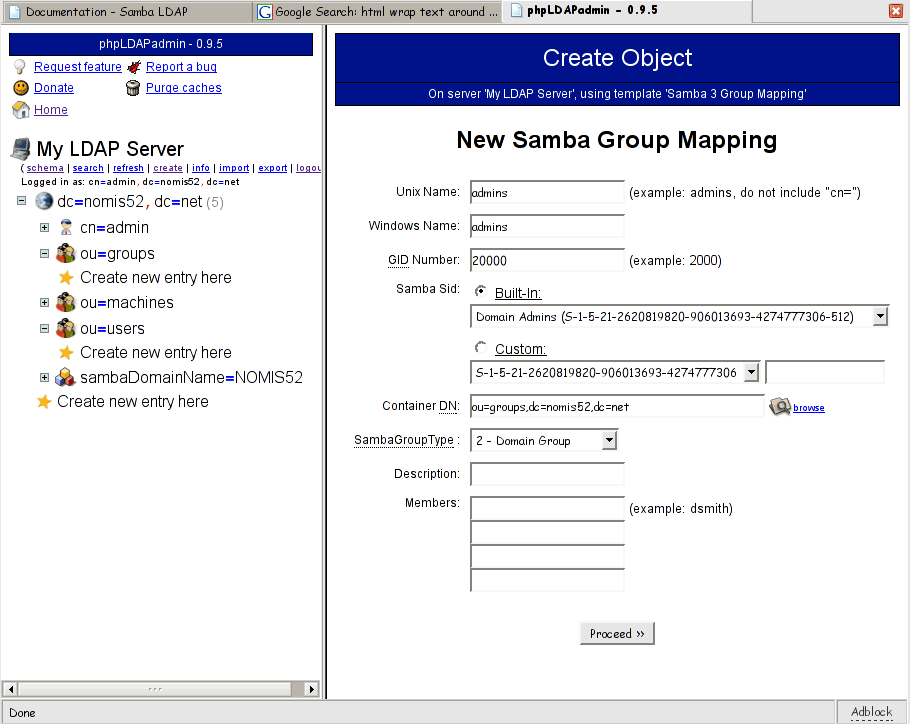
- We need to create some default groups. Using phpladpadmin add the following three Samba 3 Group Mappings under ou=groups:
Unix NameSamba NamegidSamba Sid
adminsDomain Admins20000Built-In -> Domain Admins
usersDomain Users20001Built-In -> Domain Users
guestsDomain Guests20002Built-In -> Domain Guests
The example below shows the admins group being created:
Setting up Unix Authentication
- Install the libnss-ldap package and configure:
$ apt-get install libnss-ldap
- LDAP Server Host: 127.0.0.1
DN of Search Base: dc=nomis52,dc=net
LDAP Version: 3
Database requires login: no
Make config readable by owner only: yes
- LDAP Server Host: 127.0.0.1
- Edit the file /etc/nsswitch.conf to look like the following:
passwd: compat ldap
group: compat ldap
shadow: compat ldapThis will search the local database (/etc/passwd) first, then LDAP. You may want it the other way round. YMMV
- Now use the getent utility to confirm that the groups created above show up:
$ getent group
ssh:x:103:
users:x:20001:
guests:x:20002:
admins:x:20000:
... - Install the libpam-ldap package
$ apt-get install libpam-ldap
- Make local root db admin: yes
Database requires logging in : no
Root login account : cn=admin,dc=nomis52,dc=net
Root password : password
Crypt : MD5
- Make local root db admin: yes
-
Samba requires an Administrator user (with a uidNumber of 0) to join Windows machines to the domain. I don't like having a root user in LDAP able to logon to the Linux workstations, so I add a filter to /etc/pam_ldap.conf . If you don't mind this (or want a single root account over all the machines) skip this step.
Add the following line to /etc/pam-ldap.conf
pam_filter !(uidNumber=0)
Which does not allow a user with a uidNumber of 0 to login using LDAP
- The following files need to be edited to configure PAM for LDAP:
/etc/pam.d/common-account
# Comment out the next line
#account required pam_unix.so
# and add these two
account sufficient pam_ldap.so
account required pam_unix.so try_first_pass/etc/pam.d/common-auth
# comment out the next line
#auth required pam_unix.so nullok_secure
# and add these two
auth sufficient pam_ldap.so
auth required pam_unix.so nullok_secure use_first_pass/etc/pam.d/common-password
# comment out the next line
#password required pam_unix.so nullok obscure min=4 max=8 md5
# and add these two
password sufficient pam_ldap.so
password required pam_unix.so nullok obscure min=4 max=8 md5 use_first_pass - At this point you probably want to restart ssh and samba
$ /etc/init.d/ssh restart
$ /etc/init.d/samba restart - Finally install the name service caching daemon:
$apt-get install nscd
Добавляем пользователей
- Ok now we can finally add some users. You'll need an Administrator (uid=0) and at least one other user. Create a new Samba 3 User(s) under ou=users like so:
Uid First Name User Name User Password Encryption Windows Group 0 Admin Administrator password MD5 Domain Admins 10000 Simon simon ******** MD5 Domain Admins 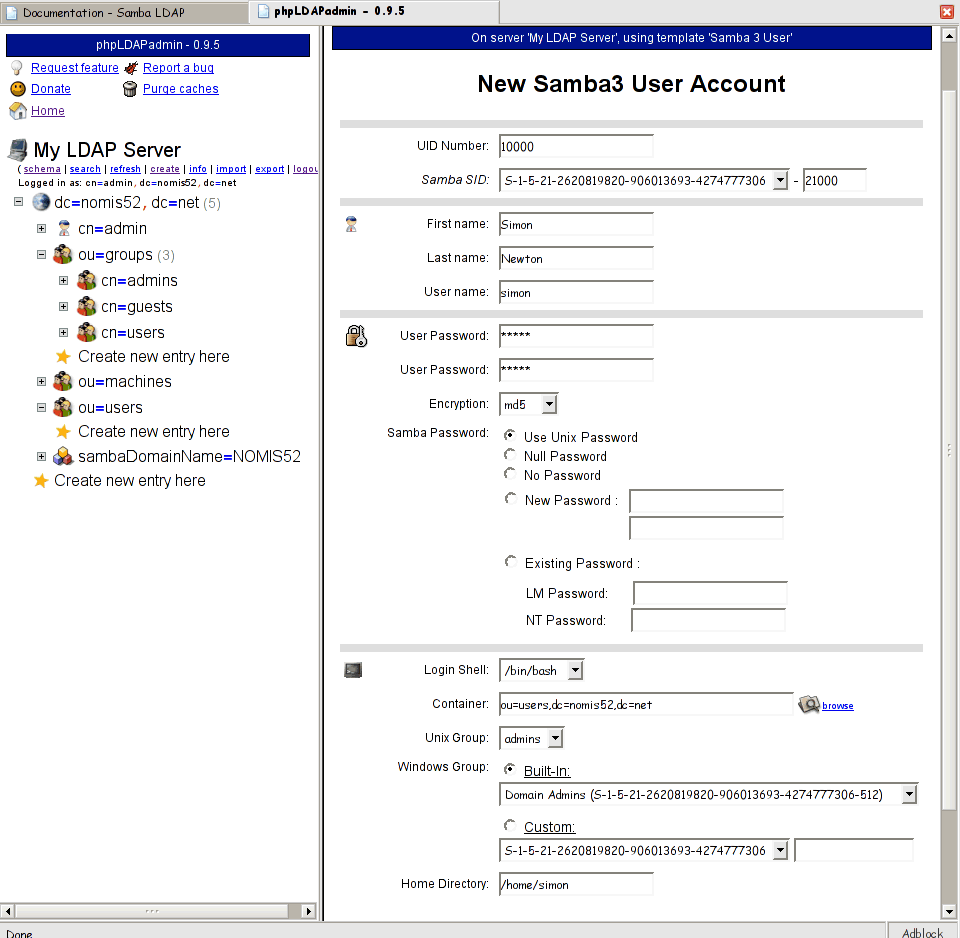
- At this point we can use getent to verify that nss is working correctly on the Linux system.
$ getent passwd
simon:x:10000:20000:Simon Newton:/home/simon:/bin/bash
Administrator:x:0:20000:admin :/home/administrator:/bin/bash
... - Finally we need to add home directories for our users:
$ mkdir /home/simon
$ cp /etc/skel/.* /home/simon/
$ chown -R simon /home/simon
$ chgrp -R users /home/simon
Проверка
- First try logging in (at the console or via ssh) with a LDAP user.
- Then try connecting to the Samba server. If you have problems check the Samba log files in /var/log/samba (/var/log/samba/log.machinename would be a good place to start).
Подключение станции к домену
You've got two options here; either we can add machines manually into LDAP, or we can setup a script to add them automatically (my preferred option).
Manual
- Create a Samba 3 NT Machine under ou=machines in LDAP. Use the following:
Where "quigon" is the name of the Windows machine. I start the machine's uid numbers from 30000. You'll need to do this for every workstation in use.Machine Name UID Number quigon 30000
Automatic
- Install the following Perl Modules:
$ apt-get install libnet-ldap-perl libcrypt-smbhash-perl
- Copy the smbldap-useradd script (and the config files) from the Samba-doc package. I put this in /usr/local/smbldaptools
$ mkdir /usr/local/smbldaptools
$ cd /usr/share/doc/samba-doc/LDAP/examples/smbldaptools/
$ cp smbldap_bind.conf smbldap_tools.pm.gz smbldap.conf.gz smbldap-useradd.gz /usr/local/smbldaptools/ $ gunzip /usr/local/smbldaptools/*.gz
$ cd /usr/local/smbldaptools
$ chmod go-r *
$ chmod u+x smbldap-useraddEdit the /usr/local/smbldaptools/smbldap.conf file to look something like this (the lines I changed are below):
SID="S-1-5-21-3131077580-1338128831-1697195685"
suffix="dc=nomis52,dc=net"
usersdn="ou=users,${suffix}"
computersdn="ou=machines,${suffix}"
groupsdn="ou=groups,${suffix}"
sambaUnixIdPooldn="sambaDomainName=NOMIS52,${suffix}"
hash_encrypt="MD5"Edit /usr/local/smbldaptools/smbldap_bind.conf:
slaveDN="cn=admin,dc=nomis52,dc=net"
slavePw="password"
masterDN="cn=admin,dc=nomis52,dc=net"
masterPw="password"Edit /usr/local/smbldaptools/smbldap_tools.pm to point to the correct config file:
my $smbldap_conf="/usr/local/smbldaptools/smbldap.conf";
my $smbldap_bind_conf="/usr/local/smbldaptools/smbldap_bind.conf"; - Browse to the sambaDomainName=NOMIS52 object in phpldapadmin. Click on add value under the object class attributes and choose sambaUnixIdPool. Click next and then enter a starting uid and gid number. (In this case the gid number won't be used. I start my machine accounts at 30000.
- Test out the script by running:
$./smbldap-useradd -w "quigon"
It should return without printing any output.
If that works, go and delete the new object uid=quigon$ in the machines ou. Also you may want to reset the uidNumber in the sambaDomainName=NOMIS52 object to 30000 (it will have been updated to 30001 now).
- Finally add the following to the smb.conf file:
add machine script = /usr/local/smbldaptools/smbldap-useradd -w "%u"
- Lastly, often we want to allow a normal user(s) to add machines to the domain. We can grant a user the rights to add machines to the domain using the following (done on the Linux machine):
net rpc -UAdministrator rights grant simon SeMachineAccountPrivilege
This grants the user "simon" the rights to join machines to the domain. If you get an error back like:
- Failed to grant privileges for simon (NT_STATUS_NO_SUCH_PRIVILEGE)
it means you don't have enable privileges = yes in your smb.conf file
Password Changes
It would be nice to allow users to change thier LDAP passwords from Windows. Some documentation makes use of the smbldap-password script to do this, but I've found adding:
ldap password sync = yes
to the smb.conf file works fine
Logon Scripts
I use KiXtart to write the logon scripts.
- Create a netlogon share, and give the admins group write access to it
$ mkdir /data/samba/netlogon
$ chgrp admins /data/samba/netlogonAdd the following to smb.conf:
# put this in the main section
logon script = logon.bat
# share for the logon scripts
[netlogon]
comment = Network logon service
path = /data/samba/netlogon
write list = "@admins"
guest ok = Yes - Logon to a Windows machine as a user in the Domain Admins group. You should have write access to the netlogon share. Download KiXstart, extract, and put the following files into the netlogon share:
- KIX32.EXE
- KX32.DLL
- Create a logon.bat in the netlogon share. You need to edit this from Windows to get the carriage returns in DOS style rather than *nix style.
\\debian\netlogon\kix32 \\debian\netlogon\logon.kix /f
- Create a file logon.kix. This will get executed when user's logon. You can mount shares, sync the time etc. Here is an example
; logon script for nomis52.net
setconsole('hide'); delete all mapped drives
USE * /delete; sync time
$timeserver = "\\debian"
Settime $timeserverIF INGROUP("NOMIS52\Domain Admins")
use n: \\debian\netlogon
ENDIF; add more drive mappings here
; map homedirectory
use u: @HOMEDIR - Logoff and login again, and check that the script is working. If it doesn't work you can run the script as a user with debug mode turned on. See the Kixtart docsumentation for more details.
Roaming Profiles
[profiles]
path = /data/samba/profiles
comment = Profiles
read only = no
browseable = yes
profile acls = Yes
browsable = no
root preexec = /etc/samba/scripts/mk_profile "%u"
We also want to hide those annoying desktop.ini files, and the RECYCLER folder that gets created on network shares. You can get Samba to set the hidden attribute on these files with the following.
hide files = /desktop.ini/RECYCLER/
Hiding Samba Password Hashes
By default the attributes sambaLMPassword and sambaNTPassword are accessible to all users (even anonymous ones). If you're not happy about this you can restrict access to the admin user and the user that owns the object by changing the lines in /etc/ldap/slapd.conf from :
access to attrs=userPassword
by dn="cn=admin,dc=nomis52,dc=net" write
by anonymous auth
by self write
by * none
to
access to attrs=userPassword,sambaLMPassword,sambaNTPassword
by dn="cn=admin,dc=nomis52,dc=net" write
by anonymous auth
by self write
by * none
Послесловие
Для меня лично этот документ оказался более полезным для построения моей первой системы Samba/LDAP.